


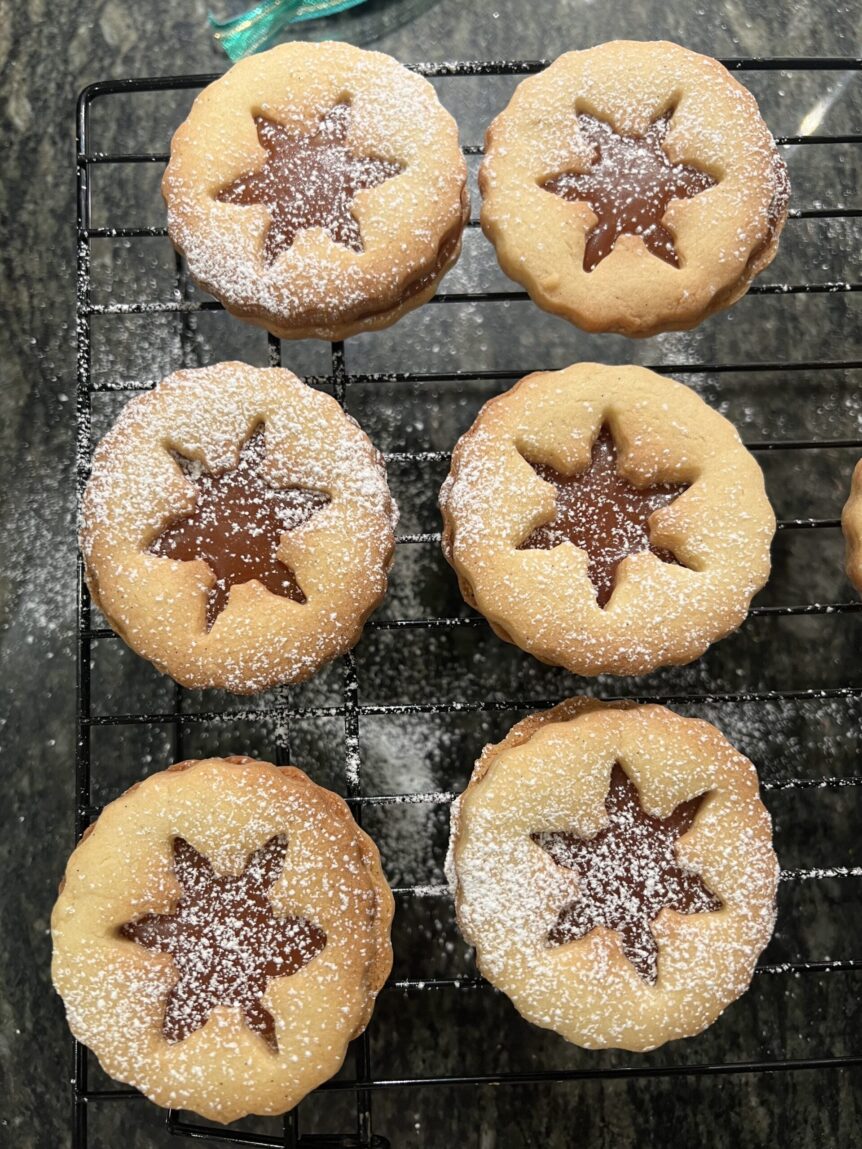
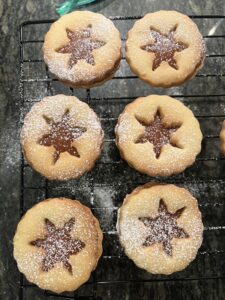
Vanilla Bean Sandwich filled with Salted Caramel
These cookies are the perfect Christmas gift for your family and friends. Plus, the center cutouts made super cute mini snowflake cookies which I glazed with lemon icing and rock sugar. My goddaughters loved these!
Alternatively, you can bake these and keep them as a Not So Secret Love Letter to yourself to enjoy with your morning cup of coffee or tea! The cookies just melt in your mouth, and one doesn’t seem to be enough!
Yield: Approximately 16-20
Time: 2-3 hours (as dough needs to chill)
Baking Time: 12 minutes
Ingredients for Vanilla Bean Cookies
The base for this cookie is so versatile. It can be used for this recipe or as a basic sugar cookie for Christmas decorating, or even served by itself! Plus, you can make this dough in advance as it will keep up to 24 hours in the refrigerator.
- 2 and ¼ cups of Cake Flour. (I use Bob Redmill’s Superfine Cake Flour)
- ¼ teaspoon of Salt
- ½ teaspoon of Baking Powder
- ¾ cup of unsalted butter (1 and ½ sticks) slightly melted (so you can still see some softened chunks of butter in the bowl.
- ¾ cup of granulated sugar
- 1 large egg
- 2 and ½ teaspoons of Vanilla Extract
- 1 Vanilla Bean Pod.
- Parchment Paper
Directions
- In a medium bowl, mix together the flour, salt, and baking powder. Set to one side.
- In a separate bowl or mixer with a paddle attachment, cream together the butter and sugar on high speed until light and fluffy.
- Take your Vanilla Pod. Use a sharp knife and score it open down its length. Take a clean teaspoon and scrape out the black seeds directly into the butter and sugar mixture. Then mix on medium speed for another minute or two to ensure the seeds are fully dispersed throughout the sugar/butter mix.
- Add the egg and vanilla extract until fully incorporated. You might need to use a spatula to wipe around the side of the mixing bowl to scrape the sides.
- Add the dry ingredients and mix until you have a smooth, sticky dough. You may need to lift the paddle if using a mixer and form the dough into a ball.
- Split the dough into 2 balls.
- Tear off approximately 8 inches of Parchment Paper, place it on your work surface,and sprinkle it lightly with Cake Flour.
- Place your first dough ball on the center of the parchment paper. Lightly cover your rolling pin with flour and then roll the dough until it’s about ¼ inch thick. If the dough is too wet/sticky, add a little more flour to its surface. Once complete, sprinkle a little flour over the top to prevent
- Repeat steps 7-9 with your second dough ball. Then carefully lift up the dough sheet and place it on top of the first one.
- Cover the top with a clingwrap and then place it on a shelf in the fridge to chill for 1-2 hours.
While your dough is chilling, make the Salted Caramel. This will take approximately 20-30 minutes.
This will yield 3 x 8 oz Mason Jars. You only need 1 x 8 oz jar fo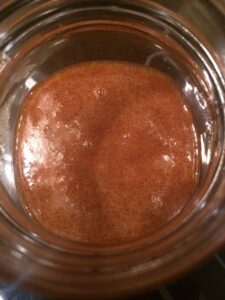 r the sandwiches. But I like to make extra and either give it away or store it for future use. This will keep for 4-6 weeks in the fridge. Please note the caramel will be a firm texture from being in the fridge. If you want to use it for drizzling or making a further batch of these cookies in the future. You will need to remove it and warm it slightly before using it again.
Ingredients
- 2 cups of granulated sugar
- 10 teaspoons (1 and ¼ sticks) of salted butter cut into small pieces
- 1 cup of heavy whipping cream
- 1 ½ teaspoon of salt
- Optional (1 tablespoon of Bourbon) I generally make the caramel without. But the bourbon really pulls out the buttery flavor of the caramel.
Directions.
- Place the sugar in a non-stick saucepan (this is really important, or you’ll be boiling water to clean out your saucepan later!) on low-medium heat.
- Keep stirring continually with a heat-resistant spoon. I have an extra spoon to hand because the sugar tends to clump to the stirring spoon. Then I scrape it off occasionally. You might be tempted to quicken up this process by using higher heat. The maximum I suggest you use is Medium. Otherwise, the sugar doesn’t melt at a consistent rate, and you’ll end up with burnt clumps.
- Once the sugar is dissolved, remove it from the heat and immediately add the butter. It will bubble up high (you can wear heat-protective gloves if you’re concerned about splashes). Keep mixing until it’s fully mixed in. Once the bubbling subsides, I place it back on the low-medium heat and keep stirring until the butter is fully combined. This can take several minutes)
- Slowly add the whipping cream, and stir until combined.
- Remove from the heat and add salt and the optional bourbon.
- Ladle or pour into your storage jars. For the extra jars you are not using, immediately place the lids on the top and leave them to cool completely before placing them in the refrigerator.
- Leave one jar without its lid on, as it will cool more quickly. This jar will be used for the cookies!
About 20 minutes before your dough is ready, preheat the oven to 350℉.
Once the cookie dough is chilled.
- Layer 2-3 baking sheets with parchment paper.
- Take your dough out of the refrigerator and place it on your work surface.
- Take a 1 and ½ or 2-inch circular cutter and cut out your circle. Place it on the baking tray. Use the same cutter and cut out your circle. Now take a small cutter (I used a snowflake, but you can use any shape that fits into the center and leave you at least a ¼ inch border) and remove the centerpiece. I baked these center cutouts and decorated these with the icing glaze below. My kids love them just as much as these sandwiches. Or you can roll it back up at the end and make a few extra sandwich cookies!
- Repeat step 3 until all the dough has been used.
- Place in oven and bake for 12 minutes until very lightly browned at the edges.
- Remove from oven and transfer to cooling rack.
- Leave to cool completely.
- Place a piece of parchment paper on the shelf of your fridge.
- Take the circular base and spoon about ½ teaspoon of caramel and then take the cookie top and place it on top. Place in the fridge on parchment paper if your caramel is runny, this will help the cookie set in place. Repeat until done.
- Once the cookie caramel has set, dust it with powdered sugar.
- Enjoy!
Bonus Cookie – Glazed Sugar Cookies
Now for the bonus cookie! If you decided to bake the center cutouts, you’ll have many shapes.
These are great to add to cookie gift boxes, give to kids (my 10-year-old loved them), or snack on yourself!
- Take a ¼ cup of sifted powdered sugar (you must sift this or it will clump). Add the juice of ½ lemon and mix until combined.
- Take your cookie, and dip it facedown into the powdered sugar mix. Then add sugar crystals.
- Leave to dry.
- Enjoy!